How to Install Odoo14 on Ubuntu20
Introduction
This article introduces the steps to install Odoo14 on Ubuntu20. Postgresql, wkhtmltopdf and python3 has to be installed first in order to running Odoo properly. Remember to sign in with ROOT.
- Update packages
- Install Python3
- Install Postgresql
- Install Wkhtmltopdf
- Install and configure Odoo14
- Configure reverse proxy of apache
- Verification
1 Updates
- Sudo apt update
- Create user: sudo useradd -m -d /opt/odoo14 -U -r -s /bin/bash odoo14
2 Install Python3
Input command below to install Python3:
sudo apt install git python3-pip build-essential wget python3-dev python3-venv \
python3-wheel libfreetype6-dev libxml2-dev libzip-dev libldap2-dev libsasl2-dev \
python3-setuptools node-less libjpeg-dev zlib1g-dev libpq-dev \
libxslt1-dev libldap2-dev libtiff5-dev libjpeg8-dev libopenjp2-7-dev \
liblcms2-dev libwebp-dev libharfbuzz-dev libfribidi-dev libxcb1-dev
3 Install Postgresql
3.1 Install Postgresql
sudo apt install postgresql
3.2 Create postgresql user
sudo su - postgres -c "createuser -s odoo14"
4 Install wkhtmltopdf
Installing wkhtmltopdf by following command:
sudo apt install ./wkhtmltox_0.12.6-1.bionic_amd64.deb
5 Installing and Configuring Odoo 14
5.1 Switch to user odoo14:
sudo su - odoo14
5.2 Get packages from github
git clone https://www.github.com/odoo/odoo --depth 1 --branch 14.0 /opt/odoo14/odoo
5.3 Switch to certain directory
cd /opt/odoo14
5.4 Using python environment
- input following commands:
python3 -m venv odoo-venv
source odoo-venv/bin/activate
pip3 install wheel
pip3 install -r odoo/requirements.txt
- Quit the environment by following command: Deactivate
Note: If you encounter any compilation error during the installation, make sure all required dependencies listed in the Installing Prerequisites section are installed.
5.5 Configuration
- Create a new directory that will contain the 3rd party addons:
mkdir /opt/odoo14/odoo-custom-addons
- Switch back to root user by inputting command ‘exit’
- Create the configuration file:
sudo vim /etc/odoo14.conf

[options]
#This is the password that allows database operations:
admin_passwd = my_admin_passwd
db_host = False
db_port = False
db_user = odoo14
db_password = False
logfile = /opt/odoo14/odoo-server.log
addons_path = /opt/odoo14/odoo/addons,/opt/odoo14/odoo-custom-addons

max_cron_threads = 1
workers = 3
db_maxconn = 80
xmlrpc_port = 8069
longpolling_port = 8072
Note:
- admin_passwd is what you want to set for the master password
- work # The maximum amount of work is the number of CPU cores * 2 + 1, so remove the CPU used by other programs and fill in the rest here
- db_maxconn # postgresql default 100,must less than it
- xmlrpc_port # The default port is 8069, if there is more than one instance, change it to the specified port
- longpolling_port # Long connection port, after enabling multi-work, the default is 8072, if you have more than one instance, please modify the
- Creating Systemd Unit File:
sudo vim /etc/systemd/system/odoo14.service
[Unit]
Description=Odoo14
Requires=postgresql.service
After=network.target postgresql.service
[Service]
Type=simple
SyslogIdentifier=odoo14
PermissionsStartOnly=true
User=odoo14
Group=odoo14
ExecStart=/opt/odoo14/odoo-venv/bin/python3 /opt/odoo14/odoo/odoo-bin -c /etc/odoo14.conf
StandardOutput=journal+console
[Install]
WantedBy=multi-user.target
- Reset the system configuration and take effect.
sudo systemctl daemon-reload
sudo systemctl enable --now odoo14
sudo systemctl status odoo14
To see the messages logged by the Odoo service, use the command below:
#sudo journalctl -u odoo14
6 Configure reverse proxy of apache or Nginx
- Refer to the link at https://blog.containerize.com/2021/05/21/how-to-configure-apache-as-a-reverse-proxy-for-ubuntudebian/#:~:text=%20How%20To%20Configure%20Apache%20as%20a%20Reverse,web%20server%20is%20now%20installed%20and...%20More%20 or adding the content below at the end of the main configuration file:
Here we using apache as an example.
<VirtualHost *:80>
ServerAdmin admin@site.com
ServerName odoo.shared-servers.com (need to be changed)
ProxyRequests on
<Proxy *>
Order deny,allow
Allow from all
</Proxy>
ProxyPass / http://127.0.0.1:8069/
ProxyPassReverse / http://127.0.0.1:8069/
</VirtualHost>
Note: Servername and proxypass are the ones that need to be configured.
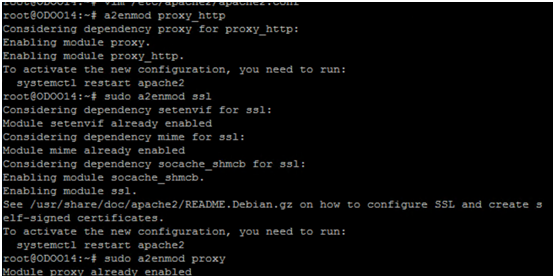
- Take effect on those configuration files.
a2enmod proxy_http
sudo a2enmod ssl
sudo a2enmod proxy
sudo a2enmod proxy_balancer
sudo a2enmod proxy_http
7 Verification
Input the domain name on URL, you will see the main page of Odoo if you following all the steps properly.