How to Add A New Web Site in IIS Manually
1 Introduction
This tutorial shows how to add a new site to IIS manually without WebsitePanel;
2 RDP to the Server
3 Create a Folder for the New Website Files
3.1 Create a Folder for All the Websites in the Server
If there is not a folder for all web files in the server, create a folder named “Websites”.
3.2 Create a New folder in "Websites" Folder
( The folder name is based on the domain name.)
3.3 Create wwwroot and log folders
Click into the domain folder to create wwwroot and log folders
4 How to Open IIS Management
4.1 Click the “Server Manager”
4.2 Click the Internet Information Services (IIS) Manager in Tools
State
4.3 A Screenshot of The IIS Management Interface
5 Add Dedicated Application Pools
It is better to create a dedicated application pool for a website before creating a website.
5.1 Right click “Application Pools”
5.2 Type the domain in “Name”
6 Add a New Website from the IIS Management
6.1 Right Click the Site and Click “Add Website…”
6.2 Type the Site Name and Select the Website Files and Select the IP Address
- Type the domain name in “Site name”
- Select your site’s files path by clicking “Physical path”
- Select the server IP address in “IP address”. It is better to select “All Unassigned”
- Type the Binding in “Host name”
7 The Website is Created
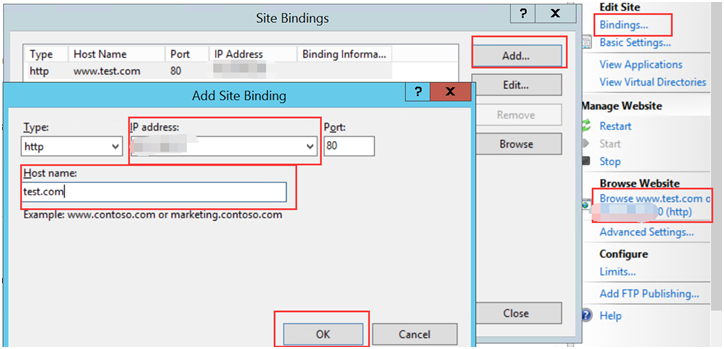
8 Add the Site Binding
In general, there should be two hosting headers in “Site Binding”. They are “test.com” and “
www.test.com”. You can add any other headers if they are the alias of the domain.

9 Update Local Host File to Test the Web Site
Click the correct path and edit the hosts file to add domain host (IP “Table” domain)
10 Test the Site
10.1 Create the File Named Default.aspx Under the Folder “wwwroot”
10.2 Test the site in a browser
11 Done
Article ID: 338, Created: August 23, 2016 at 10:06 PM, Modified: February 25, 2021 at 12:24 AM