How to install RDS on Windows 2019
Steps
1. Install Server Roles and Features
2. Activate RDS License Server
3. Install RDS License
4. Configure Group Policy
1. Install related roles on server manager
1.1 On your Windows server go to Server Manager → Add roles and features
1.2 Server Roles: Select Remote Desktop Services and Remote Desktop Licensing Diagnoser, click Next.
1.3 Select role services:
Click Add Feature on the pop-up message
Select Remote Desktop Licensing and Remote Desktop Session Host
Click Yes on the warning message
1.4. Wait for the installation to complete
2. Activate RDS License Server
2.1. Open the Remote Desktop Licensing Manager.
Right-click the name of your server and select Activate Server.
2.2. Activate Licenses on the Remote Desktop License Server
2.3 At 'Company Information' window, fill the required fields and click Next to activate your License Server.
2.4 When the activation is completed, leave checked the 'Start Install Licenses Wizard' checkbox and click Next.
3. Install Licenses on the Remote Desktop License Server.
3.1 At 'Welcome to the install licenses wizard', click Next
3.2 On the License Program page, select the program you purchased your RDS CALs from, and then click Next. If you are a service provider, select Service Provider License Agreement.
3.3 According the License Program you selected on the previous page, type either the license code or the agreement number provided when you purchased your RDS CALs and then click Next.
3.4 On the Product Version and License Type page, Select the product version (i.e. the Windows Service version) and select 'RDS Per User CAL' as licentie type.and then click Next.
3.5 When the RDS CALs installed on the server, click Finish and check the result.
4 Configure the RDS Group policy configuration.
Open Group Policy Editor. To do that:
1. Simultaneously press the Windows + R keys to open run command box.
2. Type gpedit.msc and press Enter.
4.1 In Group Policy Editor navigate to:
- Computer Configuration\Administrative Templates\Windows Components\Remote Desktop Services\Remote Desktop Session Host\ Licensing
- At the right pane, double click at Use the specified Remote License Servers.
4.2 Then open the Set the Remote Desktop licensing mode setting.
- Select Per Device mode if server is in Workgroup environment.
- Select Per User mode if server is in Active Directory environment.
If licensing mode is set incorrectly, an error message “Remote Desktop License Issue: There is a problem with your Remote Desktop license, and your session will be disconnected in 60 minutes” will display in RDP session.
Note: Once licensing mode is set, please double-check the installed license type in step 3.5. It must be the same as licensing mode . License type can be converted between Per Device CALs and Per User CALs by clicking Convert Licenses on the installed licenses.
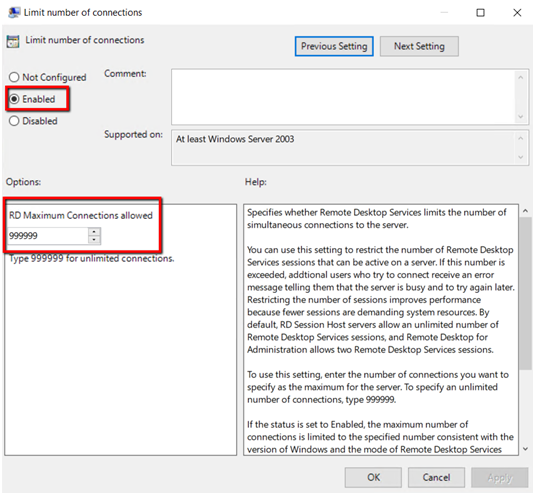
4.3 Go to Computer Configuration\Administrative Templates\Windows Components\Remote Desktop Services\Remote Desktop Session Host\ Connections
- At the right pane, double click at Limit number of connections.
5. Done
5.1 The installation is finished! You can now start using your additional Remote Desktop sessions.
5.2 Try to check the License Server status and the number of the issued licenses using RD Licensing Diagnoser (Server manager-> Tools -> Remote Desktop Services -> RD Licensing Diagnoser).