How to Apply an SSL on Windows IIS
Introduction
Here is the instruction on how to apply an SSL certificate for a website on Windows IIS.
To apply an SSL for a website, you have to have a .pfx file and its import password in hand.
To get the file and the password, you can download it from the new client control panel.
1 Import SSL from the .pfx file
- Log into the server where your website is located.
- Open IIS. Click Server Certificate.
- Specify the certificate file (.pfx file).
- Fill in the import password of the .pfx file.
- Click OK to complete the certificate import process.
2 Set Certificate Bindings
2.1Open the site binding window
- Choose your site. Click Bindings.
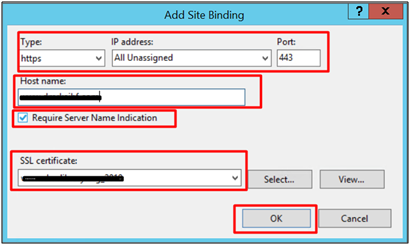
2.2 Add the SSL binding
- Type: https.
- IP address: If Windows Server 2008 is used, please assign a dedicated IP to the site. For other types of servers, a designed IP is not necessary.
- Port: 443.
- Require Server Name Indication: Please check the option if Windows Server 2012 R2 / 2016 / 2019 is used.
- SSL Certificate: Choose the SSL imported before.
When all settings are configured, click OK.
3 Test
Your certificate should now be installed. You can navigate your site (https://YourDomain.com) in a web browser and check for the padlock to verify the installation.
Article ID: 713, Created: December 29, 2020 at 2:04 AM, Modified: July 8, 2025 at 1:57 AM